Friday, September 25, 2015

Plank Wall Tutorial

My pallet wall is my favorite wall in my house.  You have probably noticed it is in a lot of my pictures.  It just makes such a great backdrop and I love the texture.  The best part is it is easy to do and super cheap!


Monday, September 21, 2015

Low Cost High Impact Decorating

I love to make my house a home, to personalize it to my taste.  However, it can be very expensive to decorate an entire house.  Here are a few of my favorite $10 of less decorating tips to make a statement in your home.

I love my book page wreath.  It has been with me for a very long time now, and it is still one of my favorite DIY projects.  It cost me about $6 and it took me 2 hours. You can see me video tutorial here


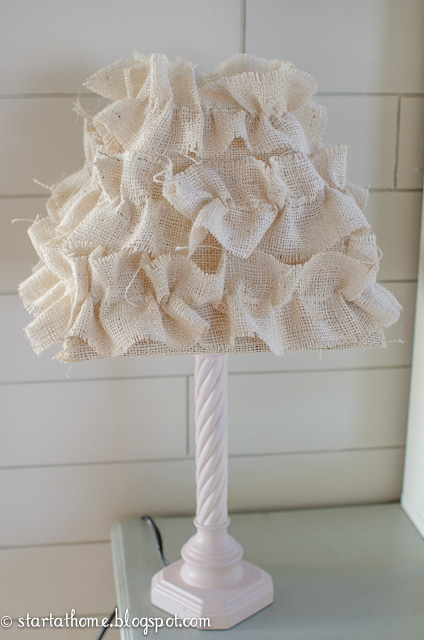
How about a lamp revamp?  Did you know updating your lamp shade can give your lamp a whole new look and feel?

I wrapped twine around this dated lamp and cut the ugly orange jewels that were hanging off the bottom off.    It adds a great natural texture and brought this beauty back to life


For this lamp I first covered the lamp shade with burlap and then hot glued gathered pieces of burlap over the top.  For the base I quickly painted it with some left over paint for a previous project giving this lamp a whole new life!


Don't we all love a good pallet project.  
For these frames I used left over pallets from our sod and painted them white to really bring out their rough texture.  


And last but not least, I love to decorate with jars, any kind of jars.  
I fill them with flowers or .....


any kind of knick knacks I can find around the house, like corks or old sewing spools.


I also love painted jars.  I used chalk paint to paint this jars and then lightly sanded over the lettering on the jar to make it stand out!  


I hope you can use a few of these tips to spruce up your own home!


Brooke

You can follow me here:
 photo instagram_zps88445fe4.png  photo fb_zps5d3a02b1.png  photo twitter_zpsb5c638e9.png  photo pinterest_zps0cdb4597.png

Here are a few of my favorite posts

DIY Open Shelves in the Kitchen


Vintage French Dresser Turned Bench


Tuesday, September 15, 2015

Fall Decorating part 1

It is pouring rain here today.  I have opened all the windows to let the sound in.  It is slowly getting me in the mood  for fall.  I always dread fall just a little bit, not because I hate fall but because I know winter is next.  I am not a huge fan of the cold or the getting dark at 5pm  but on a positive note I do love to wear my sweats everyday and drink hot chocolate.  Oh and don't forget snowmobiling...so I guess I better welcome fall.  


I made this pretty wreath last night for a group on Instagram and I am so happy with how it turned out.  I found these cute pumpkins and florals at Home Goods!  I am loving white pumpkins this year!  I added a few burlap leaves for texture.


See aren't these pumpkins the cutest??


I will be posting the rest of my Fall Decor Tomorrow!!

TTFN

Brooke

You can follow me here:


Monday, September 14, 2015

Crib Turned Bench Tutorial

I posted this tutorial over at Lou Lou Girls a few months ago but I wanted to share it here too!  I am always looking for something to repurpose.  I have to admit I love to tear things apart and turn them into something else.  When I bought this crib I didn't have any plans in mind, but it is solid wood, I loved the pretty spindles and the price was right!  I brought it home and decided to turn it into a bench!  These bench's are pretty easy to make as long as you have the right power tools!


You will need:
An old crib
a table saw
tape measure
a drill
screws
wood glue
2x4's
sand paper
paint
pine planks


For this bench I used the 2 ends.  One of the ends will be the back you don't need to do anything to this one


The second end you are going to cut in half with a table saw.  once cut you should have 2 equal parts, these are going to be the sides of your bench.

A bench seat is usually between 16 to 17 inches high.  I cut 5 inches off of these legs so they would line up correctly on the back and be the right height for my seat.


Next you are going to build a frame out of 2x4's to use as your seat.  


The back of your frame should run from post to post and should be at least 15 inches wide.
Once your frame is made you will attach it to the back of your bench with several screws and wood glue.  It is a good idea to pull out your level to ensure your bench is going together square.  


Once your frame is secured to the back you can add your side pieces one at a time.  
I like to screw them to the back as well as the center frame to make the bench as sturdy as possible.   


Now that your bench is all together fill all of your screw holes and your bench will be ready to paint!


Once your bench is painted cut pine planks the width of your bench with at least a 1/2 inch over hang.  I used a finish nailer to secure the pine planks to the 2x4 frame. 


and TADA you have a beautiful new bench!


This bench is for sale!!  Asking 4125

TTFN

Brooke

You can follow me here:


Tuesday, September 1, 2015

It has been 4 Years!!!

Today marks 4 years since we closed on our house!  I can't believe how much we have done, and I still can't believe how much we have to do.  When we first walked through this house I remember saying oh we will just rip this out and change this or that.  I under estimated how much time JUST doing something would really take.  Not to mention we had a 3 month old when we moved in and have since had another baby.

The outside was a mess we defiantly under estimated how big of a mess.  I had no idea what was really under all of these plants or the damage many of them caused to the house.  Not to mention there was not an inch of grass anywhere to be found.

And here it is now!  I love having grass and yes I love flowers!  


My entry way before


"An entryway is an introduction.
Like the opening pages of a book, it leads us in and welcomes us to the world inside."
~Rose Tarlow~

Come on in and enjoy your stay!!


My favorite renovation and the reason I agreed to buy this house was because of the size of this kitchen, I love all of the counter space!


With a little help this kitchen is now just how I want it!  We added a backsplash and replaced the countertops with granite.  I added knobs to all the cabinet doors, painted and replaced the corner cabinet with open shelves!  


I am still so happy we bought this house.  I love the location, I love my neighbors and I love that it fits all of the needs of our family within our budget.  Remodeling this house has defiantly taken time and as I said we are not even done yet.  Our stairs are in need of a lot of help, the shower in the master bathroom is still broken....which means it has been broken for 4 years now and we are currently working on the front door. This house has pushed me out of my comfort zone, I would have never started refinishing furniture or decorating.  It has taught me to work hard, to be more patient and frugal.  But my favorite thing about this house is the pride of ownership.  I am so proud of what we have done and accomplished, I love to say I figured it out and I did it.  And in the process we made memories, lots and lots of memories!  


You can see all of my house renovation here

Brooke

You can follow me here:


LinkWithin

Related Posts Plugin for WordPress, Blogger...